

Okay, so I’ve done something a bit outside the norm.
I‘ve got 2011 BMW 335d, this car is fantastic especially since I haven’t had nearly as many Check Engine lights as the previous 2 versions of my car. I’ve owned 335d’s for a bit over 9 years now. I’ve never had a great opportunity to pick up a x35d but who knows maybe one day.
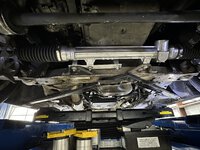
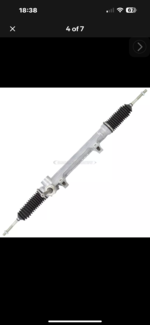
After some thread studying I decided to lock in on a Z4 rack and pinion from the 2006-2008 year range and install it on the E90 LCI.
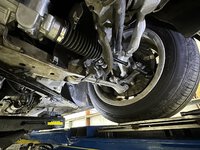
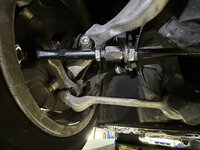
I admit I wasn‘t sure it was going to work but after evaluatIng the mounting situation and extended tie rod modification on the passenger side it mounted up nicely. You will need to swap the tie rods from your old rack or get new ones as the z4 uses shorter rods.
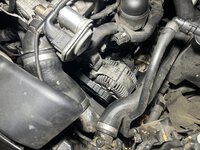
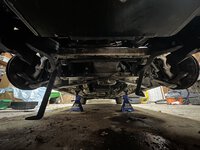
Back to the rack mounting. The subframe hole just don’t line up. I had to bolt together plates of Aluminum and make bushings from square tube aluminum to get it firmly mounted in the passenger side subframe hole. Also be prepared to spread the top mounting bracket flange on the drivers side to accommodate the rack mounting bracket difference as the z4 rack has a slightly beefier build. All that you’ve got to do is get it spread and then pretty much bolt it down to close the gap. Then loosen it to fit the steel or aluminum top plate. On the reinforcement bolt in the mid of the bracket I’d grind down the head so the oil pan has more clearance.
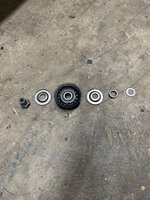
For the pinion shaft I ended up cutting a key way and using a plate of steel as the key.
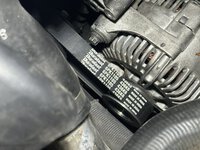
The Power Steering pump was completely removed along with the lines and the drive belt was replaced with a shorter 436k6. It is a tight fit so be ready to either stretch that one or get one just a bit longer (no more than maybe a 438k6 or so. Once that was done it’s been fitting well enough to remove and install without issue.
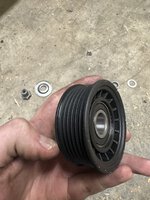
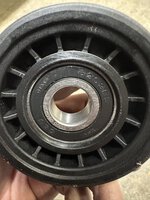
the tensioner pulley needs to be swapped for a k6 ribbed pulley and spaced in the back or front with a 1-2 mm bushing. I ended up going ahead and replacing my idler pulley since it was sounding raspy.
CONSIDERATIONS: (add more if you wish)
This possibly removes the dual fuel pump option later but I suppose you could gut and cap the pump whilst leaving the pump bearings lubricated? Or maybe even place the fuel pump into the steering pump bracket by modifying the bracket. Otherwise modify the r90 for high flow.
I really want to put it out there that it is viable but tricky when being one of if not the only person originally engineering something without any data to go by.
it is stable and functioning well. Really connects you to the power of the car. I can provide pictures but if this really is the first of its kind I’d hate to see credit stolen from anyone if it’s not to include myself If it is.
FUTURE IMPROVEMENTS:
1. The lower passenger side has some bend during installation due to its nature of being Aluminum. When alignment comes back up in 6 months I’ll be replacing that with a rust preventive coated steel On the lower plate.
2. The Tie rod extension could be longer and set with a longer threaded coupling. For what it‘s worth myself and the alignment tech found no issue as it was not moving freely.
3. The pinion shaft could be machined down to the specs of the e90 steering linkage. A key way was probably the simplest but as far the key way is concerned it would be a good idea to ensure that the linkage doesn’t pop off whilst driving. I first figured woodruff keys would be great but later decided to place a plate of appropriately sized steel in the groove with a hole drilled for the linkage bolt.
PARTS LIST:
z4 manual rack (From my understanding there’s only one from 06-08)
E90 tie rods
New boot clamps after rod swap
Tie rod extension threaded in M14x1.50
436k6-438k6 Serpentine belt
k6 grooved pulley
3 feet of 1/8 plate steel
3 feet of square tube steel
Thoughts ?
I‘ve got 2011 BMW 335d, this car is fantastic especially since I haven’t had nearly as many Check Engine lights as the previous 2 versions of my car. I’ve owned 335d’s for a bit over 9 years now. I’ve never had a great opportunity to pick up a x35d but who knows maybe one day.
After some thread studying I decided to lock in on a Z4 rack and pinion from the 2006-2008 year range and install it on the E90 LCI.
I admit I wasn‘t sure it was going to work but after evaluatIng the mounting situation and extended tie rod modification on the passenger side it mounted up nicely. You will need to swap the tie rods from your old rack or get new ones as the z4 uses shorter rods.
Back to the rack mounting. The subframe hole just don’t line up. I had to bolt together plates of Aluminum and make bushings from square tube aluminum to get it firmly mounted in the passenger side subframe hole. Also be prepared to spread the top mounting bracket flange on the drivers side to accommodate the rack mounting bracket difference as the z4 rack has a slightly beefier build. All that you’ve got to do is get it spread and then pretty much bolt it down to close the gap. Then loosen it to fit the steel or aluminum top plate. On the reinforcement bolt in the mid of the bracket I’d grind down the head so the oil pan has more clearance.
For the pinion shaft I ended up cutting a key way and using a plate of steel as the key.
The Power Steering pump was completely removed along with the lines and the drive belt was replaced with a shorter 436k6. It is a tight fit so be ready to either stretch that one or get one just a bit longer (no more than maybe a 438k6 or so. Once that was done it’s been fitting well enough to remove and install without issue.
the tensioner pulley needs to be swapped for a k6 ribbed pulley and spaced in the back or front with a 1-2 mm bushing. I ended up going ahead and replacing my idler pulley since it was sounding raspy.
CONSIDERATIONS: (add more if you wish)
This possibly removes the dual fuel pump option later but I suppose you could gut and cap the pump whilst leaving the pump bearings lubricated? Or maybe even place the fuel pump into the steering pump bracket by modifying the bracket. Otherwise modify the r90 for high flow.
I really want to put it out there that it is viable but tricky when being one of if not the only person originally engineering something without any data to go by.
it is stable and functioning well. Really connects you to the power of the car. I can provide pictures but if this really is the first of its kind I’d hate to see credit stolen from anyone if it’s not to include myself If it is.
FUTURE IMPROVEMENTS:
1. The lower passenger side has some bend during installation due to its nature of being Aluminum. When alignment comes back up in 6 months I’ll be replacing that with a rust preventive coated steel On the lower plate.
2. The Tie rod extension could be longer and set with a longer threaded coupling. For what it‘s worth myself and the alignment tech found no issue as it was not moving freely.
3. The pinion shaft could be machined down to the specs of the e90 steering linkage. A key way was probably the simplest but as far the key way is concerned it would be a good idea to ensure that the linkage doesn’t pop off whilst driving. I first figured woodruff keys would be great but later decided to place a plate of appropriately sized steel in the groove with a hole drilled for the linkage bolt.
PARTS LIST:
z4 manual rack (From my understanding there’s only one from 06-08)
E90 tie rods
New boot clamps after rod swap
Tie rod extension threaded in M14x1.50
436k6-438k6 Serpentine belt
k6 grooved pulley
3 feet of 1/8 plate steel
3 feet of square tube steel
Thoughts ?
Attachments
-
 IMG_3059.jpeg326.5 KB · Views: 32
 -
 IMG_3060.jpeg353.3 KB · Views: 11
 -
 IMG_3061.jpeg287 KB · Views: 11
 -
 IMG_3062.jpeg250 KB · Views: 9
 -
 IMG_3064.jpeg300.9 KB · Views: 9
 -
 IMG_3065.jpeg269.3 KB · Views: 9
 -
 IMG_3040.jpeg380.2 KB · Views: 10
 -
 IMG_3041.jpeg336.4 KB · Views: 8
 -
 IMG_3026.jpeg287.5 KB · Views: 2
 -
 IMG_3027.jpeg278.2 KB · Views: 5
 -
 IMG_3025.jpeg646.4 KB · Views: 8
 -
 IMG_3018.png159.3 KB · Views: 10
 -
 IMG_3046.jpeg315.8 KB · Views: 15